

It’s actually true. Well. If you are a complete beginning sewists, it might take you two hours, but still. Very easy. And very fast.
Also it’s a great way to use that 50 cm of fun jersey you don’t know what to do with (+ a length of wide elastic, mine is 5 cm (2″) wide) – just make a fast made-to-measure skirt!

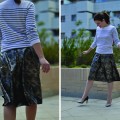
Yes. It was cold for a minute but I wanted you to see the skirt without it getting covered by a sweater. (and it was only for a minute, then I put my jacket back on)
How do I know this?
As you might remember, I was teaching a bunch of unemployed young people how to sew for a couple of weeks just before Easter break. Most of them had never sewn before!
I am not sure which projects schools and other teachers choose for teaching absolute beginners how to sew (I suspect pillows?), but I want them to make something that they will actually use and be happy about making.
So for the first project (to learn how to use the sewing machine + how to use a sewing pattern) we made fleece socks. Then we jumped right into inserting zippers and made an unlined cosmetic pouch (later these evolved into all kinds of fabulous clutches made from fake leather and really cool oil cloth!) and after a small intermezzo with lined pouches, I decided it was time they learned how to draft and sew their very own fitted skirts.
So I came up with a very easy pattern drafting guide, and we all got to work.
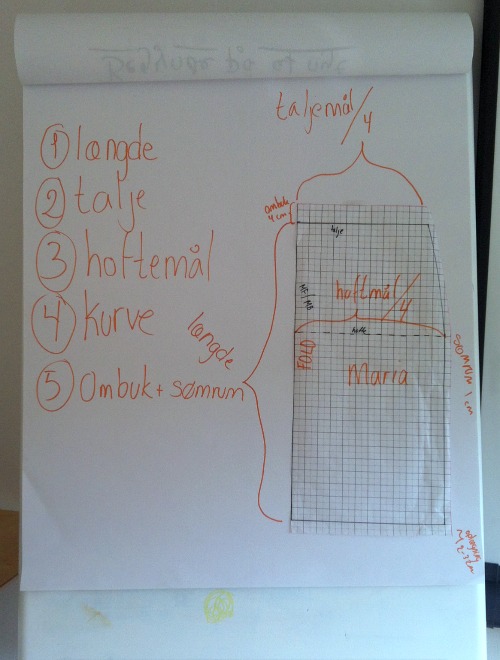
The flipover I used for teaching the Danish seweists. Scroll down. There is one in English, don’t worry.. Since this course, I’ve changed the procedure slightly. It’s updated below.
And now I’m going to show you!
A note about the fabric: We are working with knits. I prefer medium weight knits such as ponte knits or sweatshirt fabric or cotton-lycra blends, but a lot of my students also loved working with the thinner rayon jerseys. Especially for the longer skirts. But anyway. Knits, okay? Otherwise this won’t work at all!
Measuring: We’ll need your waist measurement, your hip measurement and the finished length of the skirt.
I have a student in one of my sewing classes, who insists that the shortest length of a skirt from the waist down, should be the age (in centimetres) you actually are. Which means, my skirts should be at least 39 cm. I usually make mine about 45 cm, I don’t know if it says anything about how old I feel? ALSO. If you are 20 years old – can I just say that 20 cm is always too short if you are even considering bending over!
And now to the drafting! We are making one pattern piece that will be placed twice on fold on the fabric. It’s the same pattern piece for the back skirt and for the front skirt. This is one of the reasons why this skirt only works with stretchy knits. We have bumps on the back, that we don’t have on the front, and we need the fabric to mold over them. Which is what knits do…
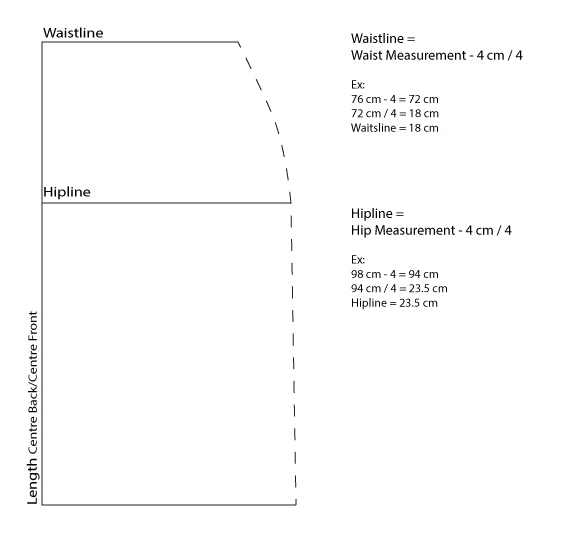
- First make a vertical line the length you want your skirt to be from waist down. I like mine to be about 45 cm (18″), but you can make it as long as you want (or as short). Several of my beginner students made a maxi-length skirt.
- Then you want to make your waist line squared to the vertical line you just made before. Take your waist measurement, subtract 4 cm (1½”) and divide it by 4. This is the length of the waistline. (For instance, my waist measures 76 cm. Subtract 4 and divided by 4, that gives me a waistline length of 18 cm.)
- Now we need to figure out where to put the full hip line. So we need the vertical distance between your waist and your full hip. This is usually about 20 cm (8″), but of course depends on your body. Make a mark on the vertical line from before.
- The length of the hip line is your full hip measurement minus 4 cm (1½”) and divided by 4. (For instance, my full hip measurement is 98 cm, so I subtract 4, divide by 4 and my final hip line measures 23.5 cm.)
- Now you need to connect the dots: At the side seam, you want to make a curve from your waistline to your hipline and then let it go straight down to the hem (which measures the same as the hipline). If you want a more pencil-skirt style, simply shorten the hemline by 2 cm, and make the line from hipline to hemline slant inwards.
- Now for seam allowances. At the waistline add 5 cm (2″) for the elastic . Add 1 cm ( 3/8″) at the side seam and add a hem allowance of 2.5 cm (1″).
And that’s it – you have your pattern, ready to cut.
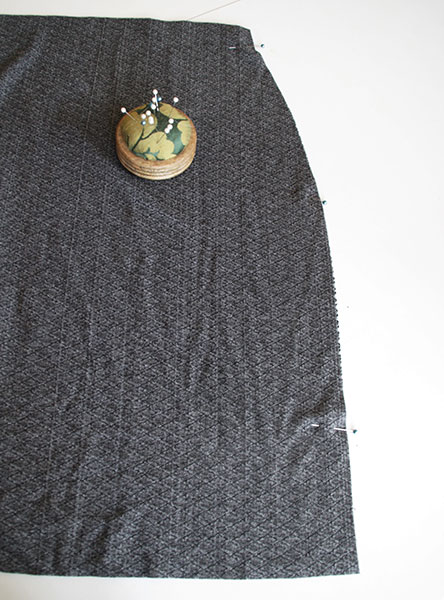
Cut out the pattern, then place it on fold of the fabric and cut two pieces.
Sewing: You want to use a stretch seam on your sewing machine. I like to use a zigzag stitch on my ordinary sewing machine (all though I often sew the side seams with my overlocker):
- Pin and sew the side seams, right sides together. Press the seams open or towards one side.
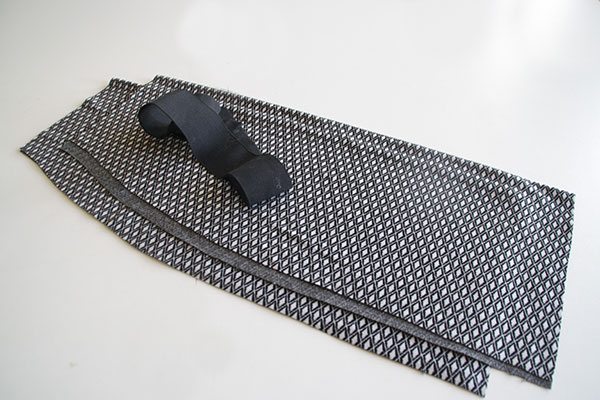
- Now try on the elastic around your waist. Stretch it a bit so that it feels comfortable but can hold up the skirt. Add 3 cm to that length for overlap and cut the elastic.
- Overlap the ends of the elastic and stitch, using a zigzag back and forth at the overlap a couple of times.
- Quarter mark the elastic and the waistline. (If you are unsure about how to quarter mark, watch this video).
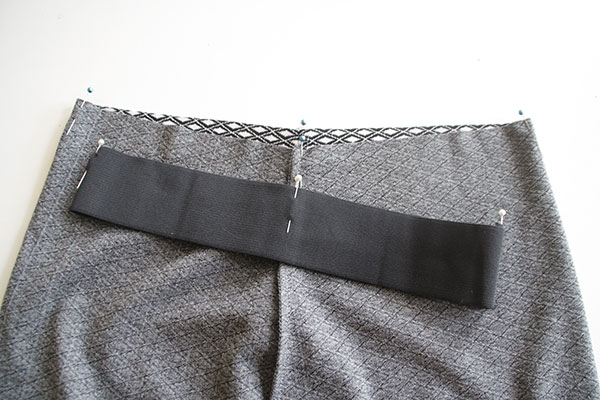
- Pin the elastic evenly to the wrong side of the waist, matching the quarter marks and stretching the elastic, to make it fit.

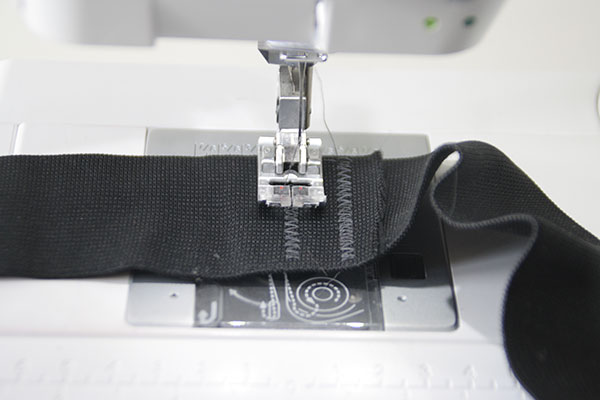
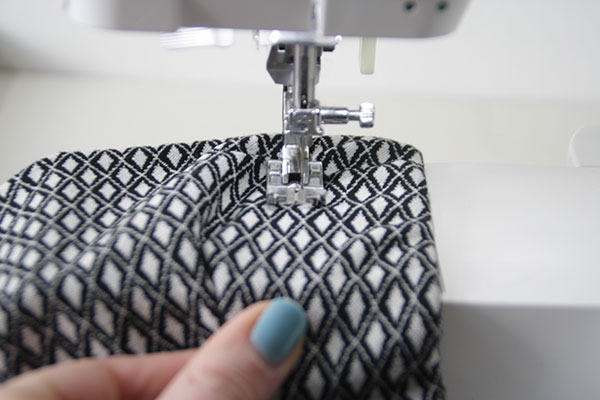
- Sew the elastic to the wrong side of the waist using an overlocker (serger) or a wide zigzag on your sewing machine. Stretch the elastic as you sew and sew close to the edge.
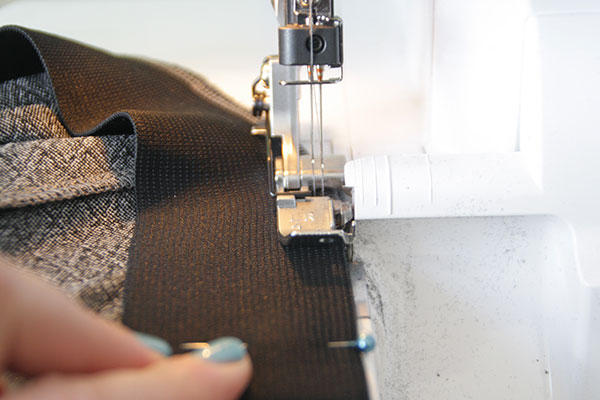
- Now fold the elastic in once, so that it’s sandwiched between the fabric.
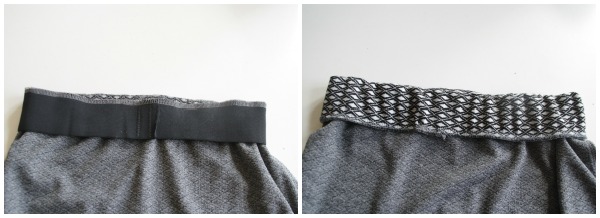
- Stitch from the right side, using a zigzag stitch or a twin needle (it has to be an elastic stitch) about 4 cm (1½”) down from the fold. Stretch the elastic as you sew.
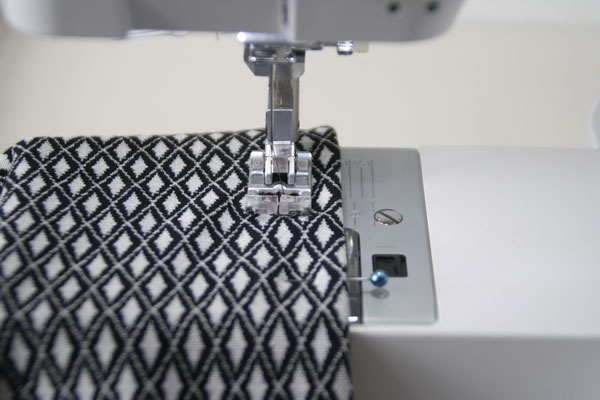
- Now all there is left to do is to fold and press up the hem and stitch it. I always use the same type of stitch as I did with the elastic (in this case, a zigzag stitch).
And that’s it. It literally takes longer to explain it that to just do it, and it’s a great beginners project! (But also great for a quick sewing fix for anyone else!)
Here are a couple of my students in their skirts

For summer I think I’m going to make a maxi length skirt (easy to pull on over shorts) in a blue-grey jersey I have and I also have a remnant of striped blue/white jersey that would be a great shorter skirt!
For now I just hang on to my wool ponte skirts!
Would you rather make a well fitting skirt in woven fabric?
Then have a look at my online course on Skirt Fitting right HERE. It’ll teach you everything you need to know. AND I’ll personally help you evaluate your fit.


Your students made some lovely skirts! I like my skirts at knee length and that’s 68 cm for me. So I guess I’m ready for retirement then? I wish, haha, think of all the sewing time there would be :D
I have not had great success with this kind of skirt. I have about a 28 cm difference between my waist and hips. But given this made of knit and the bulk at the waist is drafted out, I am optimistic. I will give this a go and let you know my results.
Thanks very, very much for taking the time to post these great tutorials!
Of course a fitted skirt with darts work better for most people who (unlike me, unfortunately) have a waist.
And I even prefer to make my skirts with darts.
But for a beginner’s project or for almost instant gratification, I think it’s great. And the waist shaping (and getting the curve right) makes all the difference from it being just a square with elastic waist.
Thanks Maria. I am going to make a couple this weekend for my 31 yo daughter’s birthday.
Your grey skirt is going to be very useful for wardrobe matching.
This tutorial will help me whip up some skirts for work. Ponte skirts are my favorite to wear for all seasons. Thank you for sharing.
Thanks so much for sharing with us. I love that you teach new students something useful.
Why do you subtract 4 cm from your waist and hip measurements. Doesn’t it end up too small?
No, because you will sew this skirt using jersey fabric, which stretches and forms to your body. To get the close fit, you need to subtract the 4 cm!
Wouldn’t you need to add 5 cm at the top to be able to turn the elastic in? Thanks for an easy and fun pattern!
I haven’t sewn for about 10 years due to various reasons, so just made a skirt following these instructions and have got my confidence and motivation back to sew regularly. THANK YOU