
HI everybody. I’m back from partying all night (and nursing the hangovers that followed) and ready to tackle those trousers.
Before we move on, can I just make sure to say that: All the steps that I write about in this fit-along are just my way of fitting trousers. These steps work for me, my sister and the friends I’ve helped fitting, but there are no guarantees and there are so many ways to fit trousers – I don’t pretend that this way is the only way or even the best way for everybody. Also, I didn’t invent any of these methods, I’m just combining from many sources and showing you how I would do it.
Now that we settled that, let’s get started:
Today is a quick lesson, we’ll prepare the pattern for the first alteration, which we’ll handle tomorrow.
Today’s tools needed (have a look at this post for details):
- Pattern
- Tape
- Markers
- Tissue Paper
- Paper scissors
- Pattern Cutting board
- Pins
Have you got your trouser pattern? If not, now is a good time to download it (or get it out from the piles of papers on your desk, if you are using a different pattern than MariaDenmark Wide Legged Trousers).
The following instructions are for if you are working with MariaDenmark 301 – Wide Legged Trousers e-book pattern (or, indeed, another downloadable pdf pattern):
Start by printing out page 17 only of the file (the page with the print-control box). Make sure you have your set your Scaling to “None” and ticked the box “Auto rotate and center”. When you have your print out, measure the box to check that it is 10 cm x 10 cm big. When everything is fine, print out page 18 -39 (since you already have your page 17!).
Now it’s time to get that pattern trimmed and taped together. Here’s a video that shows you how I quickly assemble a pdf pattern
I then use the cardboard cutting board to pin the sheets in place before taping them together. Hint: It’s sometimes easier to tape one pattern piece (i.e. the back piece, then the front piece) at a time, instead of trying to compile everything together (it’s 23 pages, and one small trimming error can distort something else).
Now we are back to where everybody should follow along, no matter what trouser pattern they are using:
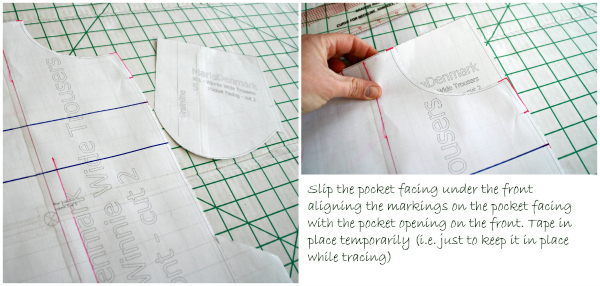
We are almost done for today, but before we stop, let’s just get the front piece ready to trace (choose your size according to your hip measurement): Get your front piece and your pocket facing piece, then slip the pocket facing under the front piece, aligning the markings on the pocket facing with the pocket opening on the front piece. Tape in place with two small pieces, that will be easy to remove again after tracing.

That’s it for today. Tomorrow we will have a look at our crotch curves and body spaces and will be tracing our pattern and getting it ready for tissue fitting.
Optional homework: This article about negative body spaces /crotch curves is great (but I’m afraid it’s only available to Treads Insider members?) and this blog post from Blooms fabric obsession also provides a lot of info.
Any questions or comments? Don’t hold back!


I’m excited to make trousers that fit