Today we are going to take a look at a sleeve adjustment. That’s because Anja wrote to me on Facebook saying:
I could really use directions for how to add width to a sleeve pattern. I want to sew a dress for my daughter but the pattern sleeves are very narrow. How do I adjust this corrrectly?
Oh, do I know about sleeves that are too small! (my arms are just the right size, thankyouverymuch ;-))
One of the reasons I make my own clothes is precisely that – that sleeves on RTW jackets etc. are just wrong for me. You see, I’ve got bingo wings. Or I’ve got arms that are kind of full in the upper area. And that causes the sleeves to be too tight and I get really annoying folds in the sleeves because the fabric gets stuck on my “muscles” (Yes, let’s call it that!) And that actually emphasizes the fullness.
How to adjust the sleeve pattern for full upper arms:
[av_one_half first]
First you need to figure out how much width you need to add to your pattern. You have three options:
- Make a muslin /toile and cut along the centre of the sleeve, then measure how much it spreads a part to figure out how much you need to add to the pattern.
- Measure your arm and then measure the pattern in the upper arm line (that’s the horizontal line right beneath the sleeve cap on the next drawing). Remember to subtract seam allowances if your pattern includes them. Then compare those measurements to figure out how much you need to add. If you are sewing with jersey the pattern measurements should be the same as your arm measurement if you want to conceal the fullness on your arm. Or maybe just 1 – 2 cm more (1/4″ – 3/4″). If you are working in wovens you need between 2 and 5 cm (3/4″ – 2″) extra ease in the overarm line, depending on what you are sewing (you’ll need more width for a jacket than for a dress). Try folding your measuring tape to the measurement you think you want and try it on your upper arm for fit.
- You can guess (I don’t recommend this ;-))
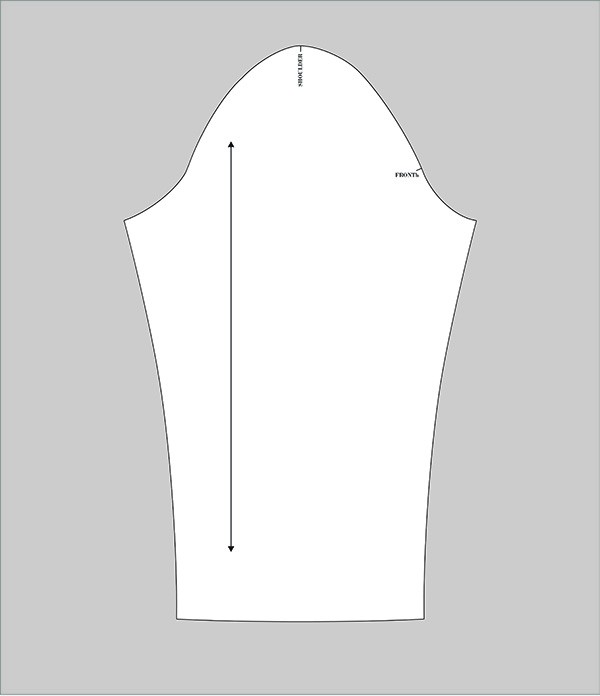
Once you know how much width you want to add, you are ready to start the actual adjustment. You’ll need your sleeve pattern on top of fresh pattern paper. The pattern in the illustrations is without seam allowances (so the outline is the seam line).[/av_one_half]
[av_one_half]
[av_one_half first]
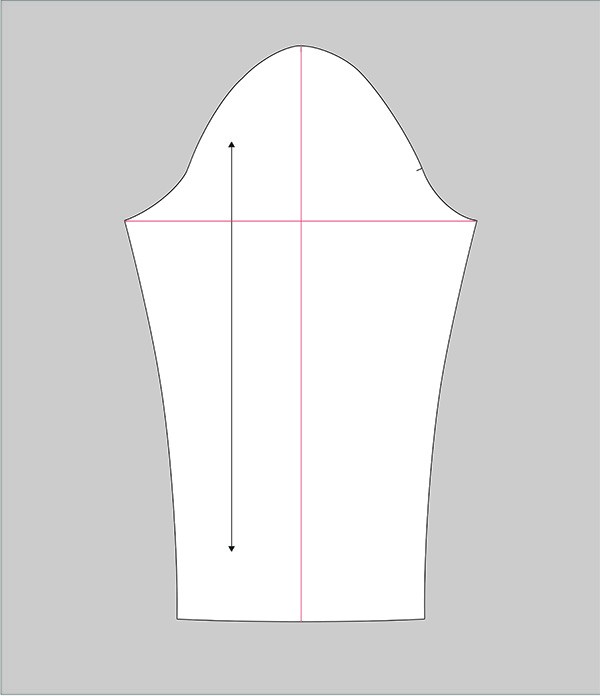
Step 1 of the sleeve adjustment:
First you need to make the pattern ready for the adjustment.
Draw a vertical line, parallel to the grain line from the top most point on the sleeve head and to the hem.
Also draw a horizontal line (the upper arm line) perpendicular on the grain line just at the bottom of the sleeve cap.
[/av_one_half]
[av_one_half]
[/av_one_half]
[av_one_half first]
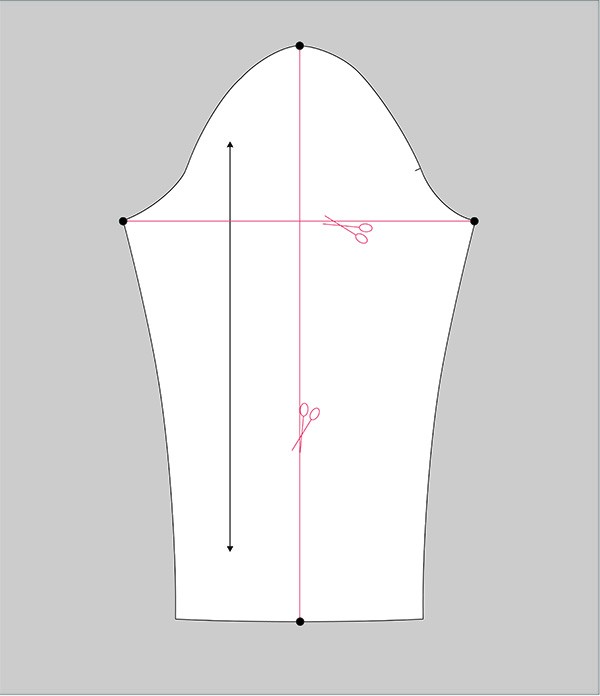
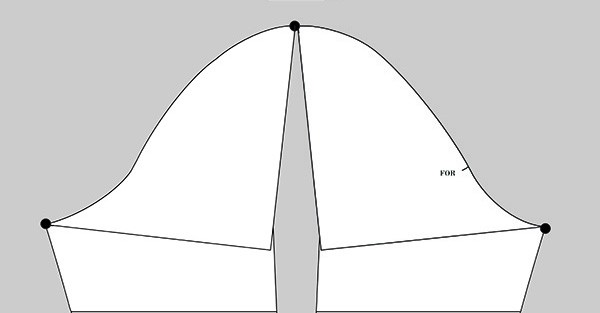
Step 2 of the sleeve adjustment:
Now cut the lines. But. DO NOT cut through the seam lines! You need to cut from the centre of the pattern and out along the lines you made before without cutting through the black dots in the drawing. Leave a small (max 2 mm – 1/8″) paper hinge.
If your pattern has seam allowances, also cut from the outline of the seam allowance to the dot, so that you only have that small hinge of paper.
[/av_one_half]
[av_one_half]
[/av_one_half]
[av_one_half first]
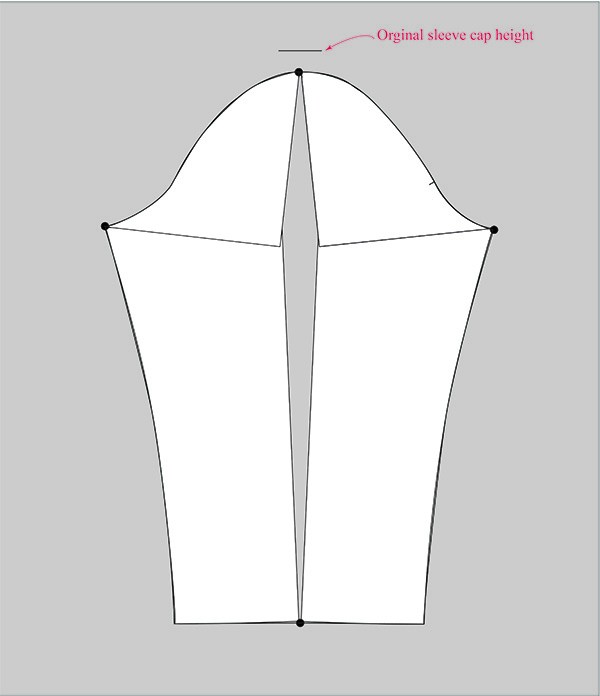
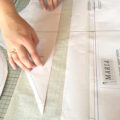
Step 3 of sleeve adjustment:
Now you can spread the lower, vertical parts of the sleeve pattern the amount you wish to add to the pattern. For instance, if you want to add 2 cm (or 1 “) you’ll spread each lower piece 1 cm (or 1/2”) towards the side.
When you spread the lower part of the sleeve out, the top sleeve head pieces will follow along and overlap the bottom pieces. This will make the sleeve cap shorter. But that’s perfectly ok, as the seam line of the sleeve will be exactly the same.
Tape the pattern parts to the tracing paper to keep it in place and trace or cut your new sleeve.
[/av_one_half]
[av_one_half]
[/av_one_half]
[av_one_half first]
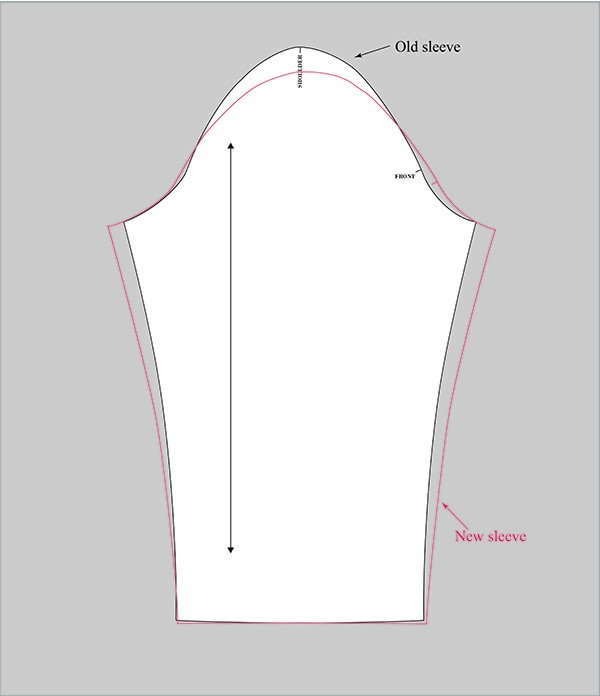
And now you’ve adjusted your sleeve pattern!
On the right you can see the difference between the original and the adjusted sleeve pattern.
[/av_one_half]
[av_one_half]
[/av_one_half]
[av_one_half first]
NB! When adjusting a short sleeve
When you are working this adjustment magic on a short sleeve, you must cut the vertical line all the way through at the hem. Otherwise you won’t be able to add the amount you need.
[/av_one_half]
[av_one_half]
[/av_one_half]




Thanks Maria!
That is absolutely brilliant! I have been looking for this for ages, as just adding extra width to the sleeve head only makes setting the sleeve into the bodice even more impossible than usual. I am forever in your debt….
Maria,
Do you think there is a maximum amount you should add using this method? Could you decrease the height of the sleeve cap too much?
Thanks for sharing your wealth of knowledge!
I also want to know how to add at least 2″ to the sleeve width. We will blame it on genetics since I have needed this since I was at least 12-13 & much thinner than I am now.
I’ve found that you really can’t add that much with this method. About 1″ is the maximum. Since I often need to add 3″ or more, I use other methods in addition to this one, such as adding to the side seams, which adds to the amount that needs to be eased into the armscye.
I needed to add 2 inches to a sleeve upper arm. I read in #2 of the top section that wovens need 3/4 – 2 inches. I just made my pattern adjustment. Now I read above that 1″ is the maximum, and that the extra width should be added to the side seams. My fabric is a stable knit (ponte) with a slight amount of stretch. I’m confused, should I change the pattern to 1″ and add extra width to the sides?
Thank you so much for posting these clear instructions. I finally understand how to widen the sleeves, which are ALWAYS too narrow for me in patterns.
At last an end to all my “arm troubles” !! Thanks a lot
Your answer was just what I needed. It’s made my day!
There are no words to describe how bodacious this is.
Life is short, and this article saved valuable time on this Earth.
Oh oh da kan til og med jeg klare Ã¥ være med, nÃ¥r det er sååå lang frist… Synes for øvrig du har gjort en imponerende jobb jeg med alle dine alonger og greier :)
Smack-dab what I was looking for-ty!
That insight’s perfect for what I need. Thanks!
So that’s the case? Quite a revelation that is.
I’m curious if this really works. I know for sure that chromotherapy works (just paint walls a different color and you’ll surely see and feel a difference) but something like this? I’m a skeptic, mainly because I’ve never read any serious research about feng shui (unlike about chromotherapy).However, I have to agree with one thing: “One of the major tenants of Feng Shui is that the center of the home, the strong energy center, must be kept clean and clutter free”. When I got rid of most of my stuff, I felt completely different (and I still keep my home clutter free).
bukan kee orang pekan cakap projek tuu VVIP ada kaitan??cerr cite yg betul jgn konar²..orang umno ker orang berpangkat yg lebih besar???
Hi David:Thanks for the comment. As an example of the kind of high quality academic group blog that, at least in my view, is as good as or even superior to any email list community, I’d offer –the East Asian history collaborative.Mills
Surprisingly well-written and informative for a free online article.
you have an interesting post on Wine Tasting Event | 10/07 | Kelly's Fine Wine & Liquor..I’ll bookmark and check back again for more new stuff..thanks from Dicks Sporting Goods Printable Coupons:)
Calling all cars, calling all cars, we’re ready to make a deal.
Her var mangen fine kupp! Likte absolutt symaskinen….det er jo ogsÃ¥ noe med "tidlig krøkes"….:)Harepusene var sÃ¥ søte! Åååå…skulle ønske jeg hadde en sÃ¥nn lamineringsmaskin….:)Ha en super kveld!
Your post captures the issue perfectly!
Mrs. Rosie, what you mean by boycott yhis blog, if it is much error for you? Are you ok? ANY WAY YOU ALSO HAVE A HAPPY VAL.DAY! An when you write back, please do not be smart. because you do not know me!!!
te doy mucha felisidades tocalla por tu embarazo y que dios te llene de bendicion a ti y a tu nina y que sigas tan linda despues del embarazo para mantener tu trabajo que es muy importante para la t v la imagen . y pamten ese matrimonio que los hijos con sus padres junto son mejores besos a los tre barbara
Always the best content from these prodigious writers.
The expertise shines through. Thanks for taking the time to answer.
Finally!!!! Thank you!!!
Just what I needed! Had this arm problem since in my 20s, it’s gotten worst because my right arm is very noticeable larger than the left one is now.
Thank you thank you thank you! This is so clearly explained, I will be able to quickly and simply do the sleeves after several weeks of trying to visualise how to adjust without messing up the sleeve cap and armhole.