

FITTING BY MERGING SIZES
VIDEO AT END OF POST
This is a great place to begin your fitting of sewing patterns! Even for beginners.
You can use this fitting technique whenever you are working with a multisized pattern. It’s the place to start when you are sewing a new pattern and will make the entire fitting process simpler.
In short: This fitting techniques is the place to begin if you want to sew clothes that fit you. And you do, right?
It’s actually quite simple: Instead of trying to figure out if you should choose your size based on your bust or hip measurement, then merge the sizes, so that the pattern is your size everywhere – and you have already accompliced a lot of your fitting.
You can use this method for all types of multisized patterns (that has the sizes nested on the pattern sheet). It is a bit more complicated when working with a pattern with a lot of pieces, like a panelled jacket or dress, but the technique is the same, and you just have to concentrate a little…
How to fit the sewing pattern to your size
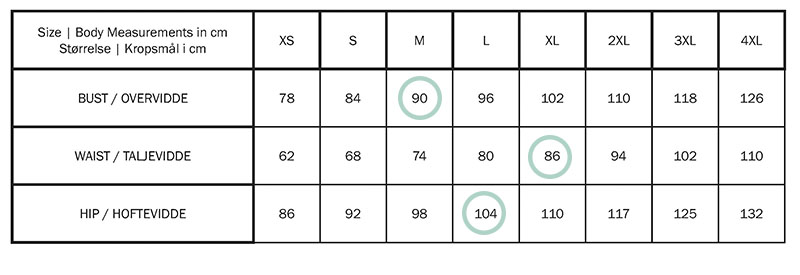
Begin by taking your measurements: Full bust, Waist and Hip (HERE is an excerpt from my e-book Foundations of Fitting that’ll show you how to measure)
Find the measurement chart for your pattern and compare it to your measurements. Circle the measurements that are closets to yours. If your measurements are between sizes, it is often best to go with the smaller size.
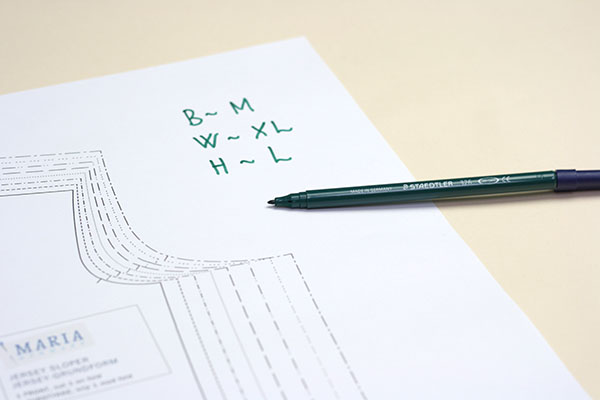
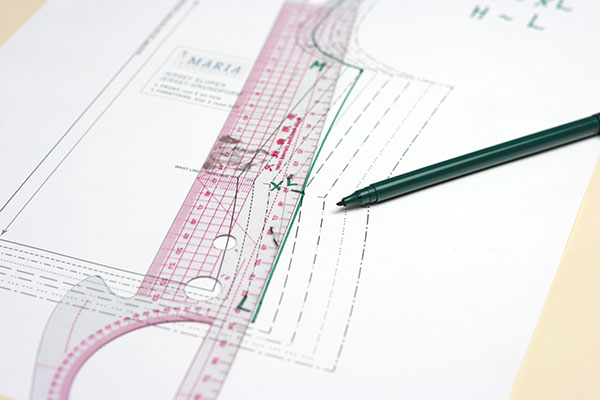
Get out your pattern pieces. I am just showing the technique on one pattern piece, but you must always make sure to merge the sizes on all relevant pattern pieces in the same areas.
Take your measurements and see how they correspond with the pattern’s size chart. In this example, the measurements fall in 3 different sizes. In the video, I’ll how you another example
I usually recommend that you don’t jump more than two sizes at a merge.
In this example, I am showing you how I merge between a size M at the bust, a size XL at the waist and a size L at the hips. In the video below, you will find a different example.
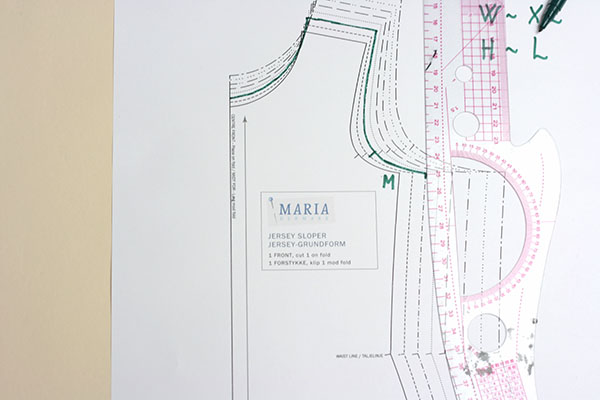
Start by tracing for the bust measurement
I begin by tracing the neckline, shoulder and armscye in the size, that corresponds with the bust measurement.

Trace the neckline and the armscye in the size corresponding to your bust measurement
Now – tracing to the waist area
From the point where the armscye and the side seam meets, you want to slide, with a nice curve, to the point of the waist marking that corresponds with your waist measurement.
If your pattern has bust darts, I recommend using the the dart that works with your bust size, and adjusting the dart legs, so that they are the same length, after the tracing.
Trace from the armscye markings in your bust size to the waist markings in your waist size. Use a French ruler to get a nice curve.
If possible, use a French ruler with measurements and notice how you place it (ei which numbers are at the bust/waist, or if your ruler doesn’t have any measurements, mark the placement with a marker), because you want to place the curve the exact same way when tracing the back piece. This way, you will get side seams that match up when you sew them.
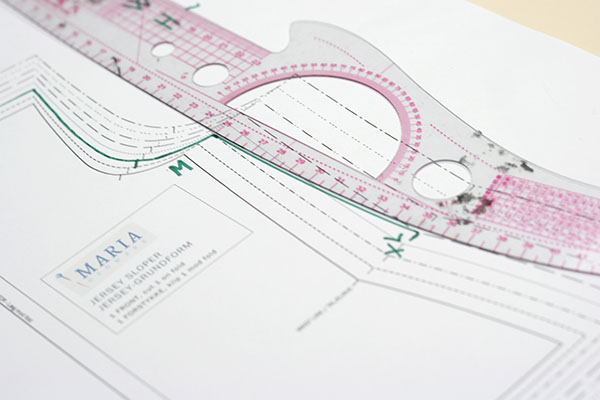
Notice how you place the ruler, because you want to place the curve the exact same way when tracing the back piece. This way, you will get side seams that match up when you sew them.
Moving on to the hip
Now we are going to merge to the hip size. If your hip measurement is in a size smaller than your waist measurement, it might be best to continue using the the size for the waist. It depends on the silhouette of the garment you are making. You want even curves and you have to be sure that you are not making the hips smaller than the waist (in most cases, that would look silly). Other than that, it’s the same technique as before.
Use the same technique as before, but flip the ruler so that it curves outwards.
This is the finished pattern piece, in this, slightly exaggerated example, it almost turns an A-shape, and if you want to go with that, you might as well just make a straight line…

The finished pattern piece
Now do the same for the other pattern piece(s). You will trace the sleeve in the same size as you traced the bust.
Then sew a muslin to check the fit! Here’s why: The measurements shown in the size chart are round measurements (going all the way around the body) and each body varies a lot in where the fullness is placed, so you might still need to alter the pattern. But now at least, you are starting out from a better place.
Video:
Want to know more about fitting?
Check out my e-book Foundations of Fitting and learn even more in Sewing Life Magazine, which has articles on fitting (with detailed how to’s) in each issue.


thank you
You mention that you shouldn’t merge a difference of more than two sizes but what if your body actually measures more than that? How do you pick a size? In my case, my hips are three sizes smaller than my bust and four sizes smaller than my waist. I don’t know whether I can merge sizes with such a large differential or not. I just purchased the Edith dress and Nana pants pattern and I don’t know where to start. What do you think?
In that case, I wouldn’t jump 3 sizes. For tops and dresses, you would go by the bust size, and for pants, I would probably pick something the one size up from the hips, and fir in the muslin. In both cases, I would definitely recommend sewing test garments to check the fit (and I always recommend that).