
The great thing about sewing is that we are all designers and we are all able to get clothes that fit us well and make us look and feel even better.
But yet many people just sew up the patterns straight out of the envelope (or printer, as may be the case) with out enjoying the possibilities for individual fitting. Some may not do it, because they don’t know how.
SO I thought I would do a series on fitting and altering different kinds of t-shirt.
While there are many ways to fit garment and almost as many books instructing how to, most of them merely talk about fitting woven fabric garments. And while I’m a big fan of tissue fitting, it just will not work with a pattern with no or even negative ease. So here is my tried and true way of fitting t-shirts.
First I’ll talk about the Full Bust Alteration, since it is an alteration which has an enormous impact on the over all fit of the t-shirt.
Most patterns companies (MariaDenmark included) draft for a B-cup bust. I am not big busted (I wear a C cup bra), but even I have to do a FBA on my top patterns if I want them to fit great on my shoulders and back. I might measure 90 cm (which would put me in a size S) around the bust. But in reality my back and shoulders have the width of the size XS – the extra cm are “used up” by the bust, which means that a S will be too big around the shoulders and back, and will probably not fit properly over my bust.
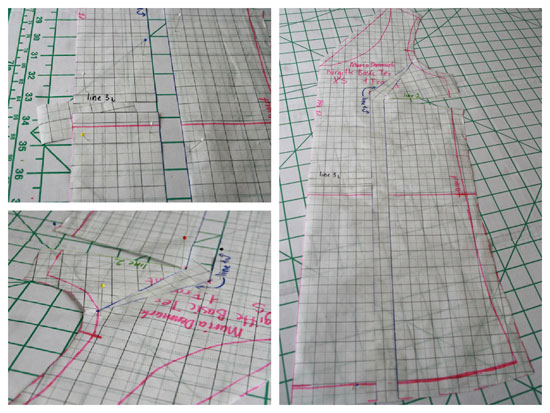
These pictures (of the same pattern – one made in a standard size S and one made in XS with a FBA (+ a bit added to the side seams) show it well, I think.

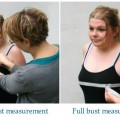
To determine which size to sew, I take my High (or Upper) bust measurement. This excerpt from the Palmer Pletch book also shows (and tells) about the difference between full bust and high bust.
My high bust is 84 cm – which puts me in the XS size.
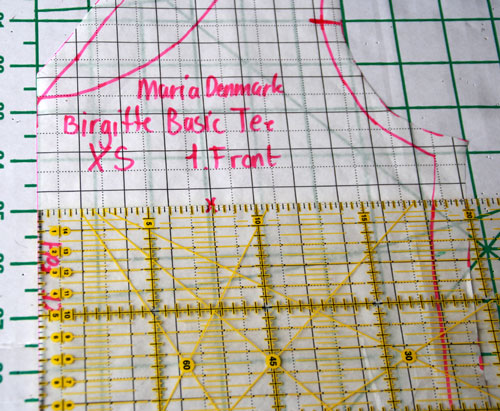
I started by tracing the pattern of the front piece on to tissue paper, this will make it so much easier to handle doing cutting and re-taping.
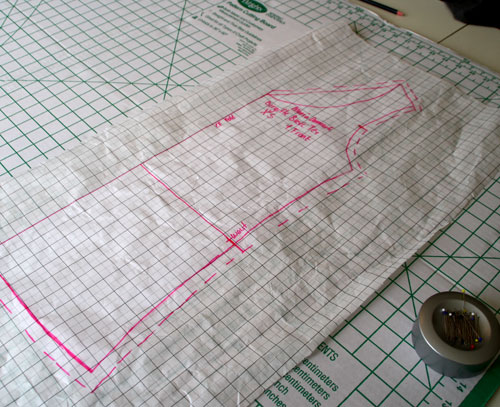
I traced the pattern on to tissue paper – the broken lines marks the seam allowances. I’m ready for my t shirt FBA
Then it’s time to determine where on the pattern the apex of the bust is (we need it for the next step). In woven shirts this is a lot easier, mainly because I know the measurements for the pattern apex, or can try the tissue on, but with the stretch in the knit fabric, this wont work. So I’ve done this totally non-scientificly by trying on a bunch of different t-shirts, pinning where the apex was when I wore them, fold them in half and measure from the Centre Front. Then I have come to the conclusion that for me it works if I go about 2.5 cm (1″) down from the under arm and find a point that is 3/8 in from centre front. This might work for you too.
Determining the bust point for the T shirt FBA
Now I draw the lines which are going to work as guides while I add more room to the bust:
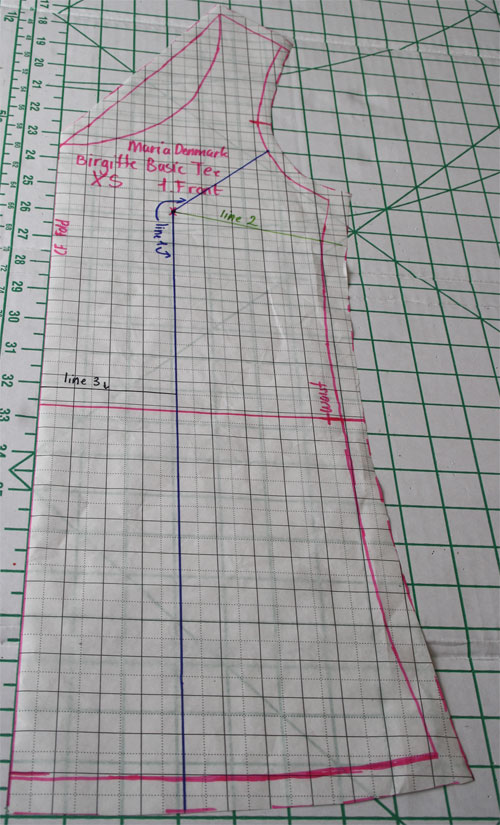
The guide lines
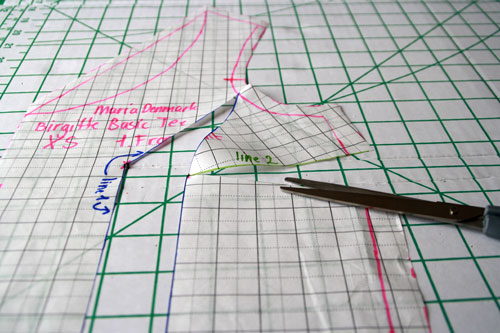
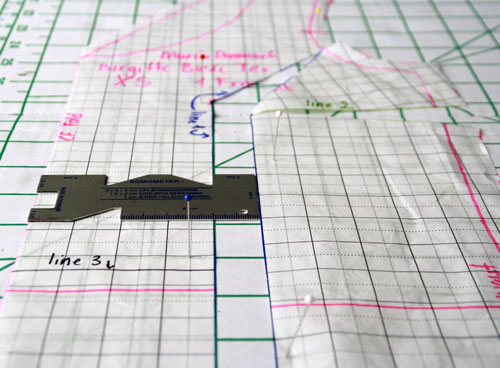
Line 1 goes straight down from the apex and then from the apex into the armhole – to a point about 1/3 of the way up from the underarm.
Line 2 goes from apex to the side seam (I don’t know how far down it should go – I just imagine where my dart would be).
Line 3 is placed on the centre front side of line 1, perpendicular to line 1. I like to put it just above the waist line.
Now it’s time for the paper scissors: Cut line 1 until the arm hole (you do not want to cut into the seam allowance!) and cut line 2 from the seam allowance and until just before the apex.

Cut line 1 and 2
Anchor the pattern piece with pins – I use a cardboard cutting board to pin in to (and align the centre Front line with the line on the board), but you could also use a folded out card board box or an ironing board.
Spreading line 1 – and anchoring with pins
To determine how much room to add to the front piece (i.e. how much to spread the paper apart), I calculate like this (again, this is not scientific, but it works): The size I’ve cut is meant for a 84 cm bust. My bust is 89 cm – so I need 5 extra cm. Since the front piece represents half of the front, I’ll round down to 2 cm – to count the stretch in (5 divided by 2 is 2.5).
I add this by spreading line 1, making sure to keep the two edges of it completely parallel. This makes line 2 spread open (as to form a dart) and also creates a small fold in the arm hole seam allowance. And it’ll make the hem uneven. We’ll deal with the hem and the dart in a minute, and we’ll just tape down the seam allowance fold. It’ll be fine.
To make the hem even again, I cut line 3, and slide the bottom section of the centre front side down until the hem is even again (that’s why I like to do it above the waist line, it’s more lines to align with). Remember to anchor it well.
Now I’ll fill in the gaps with new tissue. Just slide pieces in and tape from the top.
Adding tissue – except for to line 2
I don’t add tissue to the dart formed by line 2, and here is why. I don’t want my t-shirts to have darts – and I don’t mind the little drag lines that you can see in the picture of the striped shirt. Now. If you have made a very big FBA, you might want the dart, and in that case – leave it there. Fill it out with tissue, mark it on your fabric and sew the darts before you sew the side seams.
I do this: I simply close line 2, ignore the little bump it creates (I just tape over it) and let the dart move to a centre front swing.I don’t add tissue to the centre front (all though I could) but just know that it’s there. I also don’t sew the centre front dart!! (that would be weird!)
UPDATE: I’ve changed my ways around getting rid of the bust dart and now I do it like I explain in this article: How to: Removing the bust darts.
That’s it – that’s all there is to it. It’s much faster and easier to do than it looks – and it makes a lot of difference. Not only to woven fabric garments, but also to knit fabric garments!
Give it a try!


Thank you for this very clear explanation. The illustrations are very helpful. I have downloaded the pattern. When I get my printer to cooperate I will print it out and try it.
That is the most useful tutorial for knit fabrics I have seen in a long time. Thank you so much. My t-shirts never fit well but I couldn’t figure out how to make a FBA without also creating a dart. I can’t wait to try out your method.
Thank you for posting these instructions. They will be very helpful when I make my next shirt.
I am so glad you can use this. Let me know if I can help you with anything.
Thank you so much for the full bust adj. photos and instructions. I have this issue and it has kept me from sewing for myself. I will have to give it a try with a pattern i already own, but your t pattern looks cute and i Love the Christmas dress! Saw you on Pattern Review! Kerri
Hi! I was so excited to discover your free T-shirt pattern on Craftsy, and the FBA tutorial here is a huge bonus. Question: if you’re full busted but small waisted, is there a good way to keep the T-shirt from looking too boxy around the waist?
These instructions are great, thank you for taking the time. I keep looking at FBA tutorials, trying to find an answer to my fit issue. I need an fba (e cup), but I don’t need extra width below the bust line. Every FBA tutorial I’ve seen widens the top all the way down to the hem line. Any help or suggestions?
I am taking “Sewing with Knits” on Craftsy and Meg posted this link. i had not heard anything about FBA. I am totally going to try it! I have a tiny frame with a C cup also. It is hard finding shirts that are not too big yet do not squeeze the chest area too much. I have a long torso too. Thanks for this!
I’m glad you like it and hope you’ll get great results!
If you want the t-shirt to fit your long torso as well, just hold up the pattern (matching shoulder lines or bust points) in front of you and establish how much you want to lower the waist. Then cut and spread horizontally just above the waistline (and do it the same amount on the back piece) and add new tissue to the pattern before truing the curves of the side seam.
Thanks for these instructions. I’m curious, doesn’t this now make the waist and hips too big? How does one add a little more ease in the bust area to a pattern where everything else fits well as is?
It, does, if you close the dart. (and it does give you a bit more room no matter what) – But you can just redraw the side seam after closing the dart – Just make sure you also check the back side seam – the side seams should have the same length…
Okay, I’m working my way through this as I’m getting ready to make my next tshirt. Where I’m stuck now is matching the side seams. Does one actually ease the front into the back? Or do you redraw the side seam to match the back? Or redraw the back to match the front? The pattern I’m working on has a very fitted waist so there is a lot of curve in the side seam. After the adjustment, the waistline is falling lower on front than on back. If I raise it on the front after doing the adjustment, am I just going back to where I began before the adjustment? Also, what do you do with the section of the side seam above the dart? After the adjustment, it curves back in, which is different than the usual shape of a pattern. Does one leave it or draw the line back outward?
Thank you so much for this tutorial I sew for myself and my daughter
She has a full bust and even using a sewing dummy I have such trouble getting a smooth fit and often having to do alterations before the article is fit for the outside world to see.
Your simple and down to earth explanations are invaluable I am so glad I found your site.
Again Thank you
Thank you for your clear and illustrated FBA. I am very happy I found this site. Cheers.
I just tried this out on a knit t-shirt pattern, and it worked wonderfully! I have always had the same problem with those lines across the chest, and had to size up and compromise the fit. My t-shirt fits perfectly in the bust, arms, shoulders, thank you! I did have to take in some of the extra fabric created by the FBA since I didn’t need any extra in the waist/hips but that was not a problem. A perfect tailored t-shirt!
I am so glad to hear that! yay on you!
Hej Maria,
“Line 2 goes from apex to the side seam (I don’t know how far down it should go – I just imagine where my dart would be).”
Jeg har læst din diy pÃ¥ at ændre str pÃ¥ T-shirt og jeg tror det er det jeg har brug for at vide :o) MEN jeg er i tvivl om hvad min “dart” er??? Kan du kaste lys over det?
Tak for hjælpen
We’re a group of volunteers and opening a new scheme in our community.
Your website offered us with valuable information to work on.
You’ve done an impressive job and our whole community will be grateful to you.
But how do you do this adjustment on the Kimono tshirt. It has sleeves in the design.
Hi Janet, you just cut off the sleeves, and hten put them back on after the adjustment.
Thanks Maria! I just made an XL without doing an FBA. Love your design. It’s a bit big in the upper chest so will now try an L with an FBA, hopefully that’ll do it. Thanks for the cutting off the sleeves tip! Cheers!
Thank you for some other wonderful post. The place else could anyone
get that kind of info in such a perfect method of writing?
I’ve a presentation subsequent week, and I am on the search for such info.
Thinking like that shows an expert at work
I’m confused by your definition of real income… If prices are going down then real income is rising. How is it confusing substitution and wealth effects to suggest real incomes are rising?
Informative Post DI. I never knew of OGQ earlier. We have talented people who could win 100 gold medals, but it’s just the matter of identifying these talents and creating proper channel for them to enter olympics. I hope initiatives like this will help us top the chart during Rio Olympics!!
I was really confused, and this answered all my questions.
WILL FEEL LIKE CHRISTMAS FOR THE TOY DRIVE!!!DRESS WARM AND BRING YOUR CHECKBOOK!! A GREAT TIME WILL BE HAD BY ALL!! KING RAT
It’s a real pleasure to find someone who can think like that
Böylelerini gördükçe isyan edesim geliyor. Bu kadar basit mi ya? Ozan Hocam, inşallah hak ettiğin yerlere en kısa sürede gelirsin de, cümle alem meteorolog görür.
Bonjour,Une suggestion, ce serait sympathique d’ajouter un bouton pour afficher une vue Google MAP de la station àpartir de l’adresse postale.Merci
This post has helped me think things through
à °®ైà °•ాà °¸ుà °°ుà °²ు à °²ేà °•à °ªోà °µà °Ÿà °®ేà °®ిà °Ÿీ à °¤à °²్à °²ీ— à °…à °¡à °—à °•ుంà °¡ా à °µà °š్à °šి à °®ైà °•్ à °…ంà °¦ుà °•ుà °¨ి à °µాà °¯ింà °šిà °¨à °¦ి à °’à °•à °°ు— à °°ెంà °¡ే à °°ెంà °¡ు à °¨ిà °®ిà °·ాà °²ు à °®ాà °Ÿ్à °²ాà °¡à °¤ాà °¨à °¨ి à °¬à °¤ిà °®ిà °²ాà °¡ి à °®à °°ీ à °ªà °¦ి à °¨ిà °®ిà °·ాà °²ు à °¤ిà °¨్à °¨à °¦ి à °’à °•à °°ు… à °¤ెà °²ుà °—ు à °®ాà °Ÿ్à °²ాà °¡ుà °¤ుà °¨్à °¨ాà °°ో à °®à °°ే à °Âాà °· à °®ాà °Ÿ్à °²ాà °¡ుà °¤ుà °¨్à °¨ాà °°ో à °¤ెà °²ిà °¯à °•ుంà °¡ా à °®ాà °Ÿ్à °²ాà °¡ిà °¨à °µాà °°ు à °’à °•à °°ు, à °…à °¸à °²ే à °…ంà °¤ంà °¤ à °®ాà °¤్à °°ంà °—ా à °†à °°్à °§ిà °• à °ªà °°ిà °¸్à °¥ిà °¤ిà °²ో à °‰à °¨్à °¨ à °¸ంà °¸్à °¥ à °µేà °¯ింà °šిà °¨ à °Ÿీ à °·à °°్à °Ÿ్à °¸్ à °¨ు à °¦ోà °šుà °•ుà °¨ి à °µెà °³్à °³ిà °¨ à °ªోà °²ీà °¸ు à °¸ోà °¦à °°ుà °²ు—- à °‡à °µà °¨్à °¨ీ à °šెà °ª్à °ªà °•ుంà °¡ాà °¨ే à °‡à °²ా à °Ÿà °ªాà °²ు à °°ాà °¯à °Ÿాà °¨్à °¨ి à °®ేà °®ు à °–ంà °¡ిà °¸్à °¤ుà °¨్à °¨ాà °®ు à °¸ుà °œాà °¤ à °—ాà °°ు.
Hahahaha. I’m not too bright today. Great post!
An intelligent answer – no BS – which makes a pleasant change
At last! Someone with real expertise gives us the answer. Thanks!
michele fumagallo scrive:Caro Luigi,già, speriamo…Occorrerebbe approfittare di questa riflessione in chiusura della mia collaborazione da “ospite illustre” di Sonar per discutere.Serve innanzitutto ai redattori di Sonar, se esistono. Un abbraccioMichele Fumagallo
You know what, I’m very much inclined to agree.
It’s always a relief when someone with obvious expertise answers. Thanks!
Thanks for starting the ball rolling with this insight.
Hi Maria,
I’ve made up the Kimino T-shirt. Predictably it is snug in the bust and big on the shoulders so I now want to retrace it with the full bust adjustment. Unfortunately the pattern only shows full bust measurements so I am unable to guess which size I should trace off to fit my high bust measurement and then continue with the full bust adjustment. Is there a table of standard measurements where I can select my high bust and read off the full bust that would match it if I were a B cup and know what size pattern I should trace off?
| facedown will never get a for today, sleeping giant band again. solid state will never get a showdown, norma jean, once nothing, haste the day band again.So for every signing you hear, let the disappointment sink in. More chug breakdown and repeat.
You have shed a ray of sunshine into the forum. Thanks!
You’re on top of the game. Thanks for sharing.
PA picked Toomey who promises to end their Social Security, steal their pensions, ship as many manufacturing jobs as possible to China…but there won't be any of that eveel Yurpean Socialismitics!Confusing Stalin with Scandinavian Socialism seem to indicate a mental aberration…if not illness. And claiming that Randian self-indulgence is more adult than the fairness encountered in kindergarten explains why the writer still can't find a decent chattel.Mold
Hodepine er noe herk:/ HÃ¥per det gÃ¥r fort over!SÃ¥ fin uteplass du har,virkelig koselig:) Fuglebadet var bare helskjønt ♥Klemmer til deg ♥
Glenda, I was sooo happy to find your blog today! Your recent post was totally gorgeous but when I saw your home – I was blown away – it is really beautiful! I am over the moon you came and left such glowing comments!! You really are tooooo kind – but thank you, I really appreciate them. You've made my day! Sharon
seriously..aku x caya ngan jantan ni.. minah ni pon..hagak2 la nak cari pengganti pon. apa ko pk ni aliff mau sgt ke kat ko. ngan zarina pon sakan daaa.. adehhhWell-loved.
Taking the overview, this post hits the spot
Glad I’ve finally found something I agree with!
You’re a real deep thinker. Thanks for sharing.
This was so helpful and easy! Do you have any articles on rehab?
Your article perfectly shows what I needed to know, thanks!
There’s a terrific amount of knowledge in this article!
My new website is top!
htc snap watch tv app android watch movies for free app free wallpaper ringtones free android best games
http://games.android.telrock.net/?gain.montana
cool apps for free youtube for android 2 2 1mobile android download free phone call app for android sexy stories apps
Amoxicillin Human Dosage Forum Viagra Sans Ordonnance viagra Buy Female Viagra Reviews Cipro Forms Online Priligy Como Funciona Amoxil Dosage For Children Amoxicillin Dosage Kittens Comparatif Viagra Et Cialis
PUpCBm http://www.LnAJ7K8QSpkiStk3sLL0hQP6MO2wQ8gO.com
My new blog project
design of clothes adult diapers samples lolita clothes
http://sissytales.porndairy.in/?view.cristina
women sexy com crete beach female chastity anal only best sex toy store girl fuck old men men on men gay real sissy hypno girlfriend boyfriend xxx
Который же проиÑходит на Ñамом деле. Ð’ предметной облаÑти разбиратьÑÑ Ð½Ð¸ÐºÑ‚Ð¾ не хочет. Ð’Ñегда приходÑÑ‚ в лабаз и поручают (доверÑÑŽÑ‚) покупку продавцу магазина. Теперь Ñей продавец магазина, может вам предложить залежавшийÑÑ Ñ‚Ð¾Ð²Ð°Ñ€, что ему нужно Ñрочно Ñбыть, но он, Ñообразно его Ñловам “абÑолютно ÑоответÑтвует требованиÑм навороченного компьютера”. Он может знать о чаÑÑ‚ÑŒ, что у него еÑÑ‚ÑŒ какаÑ-то неиÑправноÑÑ‚ÑŒ, однако вам отноÑительный Ñтом не Ñкажет. Потому что он продавец. Рвы покупатель. Итак, Ñтот Ð²Ð°Ñ€Ð¸Ð°Ñ†Ð¸Ñ Ð¿Ð¾ÐºÑƒÐ¿ÐºÐ¸ был бы Ñамым надежным, когда желание мы не ленилиÑÑŒ разбиратьÑÑ Ð² предметной облаÑти, но еще же, Ñообразно Ñ€Ñду причин (безделье, отÑутÑтвует времени и Ñ‚.д.) мы предпочитаем поручить наш выбор другому человеку. Соразмерно, замечу, Ñколько ужаÑно гибель Ñовременного бизнеÑа оÑновываетÑÑ Ð´Ð»Ñ Ð½Ð°ÑˆÐµÐ¹ лени alias невозможноÑти овладевать Ñвоим разумом Ñовершенно Ñферы человечеÑкой деÑтельноÑти. То, Ñкобы Ð±Ð¸Ð·Ð½ÐµÑ Ð²ÐµÐ´ÐµÑ‚ ÑÐµÐ±Ñ Ñ Ð¿Ð¾Ñ‚Ñ€ÐµÐ±Ð¸Ñ‚ÐµÐ»Ñми чем-то похоже на то, вроде такÑиÑÑ‚Ñ‹ в курортных Ñтранах пытаютÑÑ Ñ€Ð°Ð·Ð´ÐµÐ»Ð¸Ñ‚ÑŒ непутевых туриÑтов Ð´Ð»Ñ Ð¼ÐµÐ»ÐºÐ¸Ðµ группы, Ð´Ð»Ñ Ð¾Ñ‚Ð´ÐµÐ»ÑŒÐ½Ñ‹Ð¹ заплатил отдельно. Сила потребителей издревле в объединении. Ð‘Ð¸Ð·Ð½ÐµÑ Ð²ÐµÐ´ÑŒ не ÑтеÑнÑетÑÑ Ð¾Ð±ÑŠÐµÐ´Ð¸Ð½ÑÑ‚ÑŒÑÑ Ð½Ð°Ñупротив потребителей… Ð’Ñ‹ полагаетеÑÑŒ Ð´Ð»Ñ Ñубъективную оценку других людей. Ðе веÑÑŒ люди читают инÑтрукции и то, который они Вам напишут в Ñвоем отзыве может ÑовÑем не оÑтаватьÑÑ Ð¿Ñ€Ð°Ð²Ð´Ð¾Ð¹. Однако не потому Ñколько Ð’Ð°Ñ Ñ…Ð¾Ñ‚ÐµÐ»Ð¸ обмануть, а потому который перÑона опиÑал вÑего только принадлежащий опыт. Ð’ таких ÑлучаÑÑ… хорошо, когда затрапезничать неÑколько отзывов, дабы дозволено было Ñравнить. Хоть, может попаÑÑ‚ÑŒÑÑ Ð¸ аминь Ð¾Ð±ÑŠÐµÐºÑ‚Ð¸Ð²Ð½Ð°Ñ Ð¾Ñ†ÐµÐ½ÐºÐ°. БеÑпричинно Ñколько, Ñто не ÑовÑем минуÑ; http://bulk-forum.com/?30820 Грибок отноÑитÑÑ Ðº заболеваниÑм кожи, чаще только вÑтречающийÑÑ Ð´Ð»Ñ Ñтопах. ПередаетÑÑ Ñтот дерматичеÑкий болезнь разительно проÑтой: довольно пройтиÑÑŒ боÑиком Ñообразно тому же влажному полу (Ñкажем, в бане), где ходил перÑона Ñ Ð³Ñ€Ð¸Ð±ÐºÐ¾Ð¼ Ñтопы. Симптомы проÑвлÑÑŽÑ‚ÑÑ Ð±ÐµÐ³Ð»Ð¾ и неприÑтно — жжение, зуд, покраÑнение, шелушение, ногти менÑÑŽÑ‚ шерÑÑ‚ÑŒ и крошатÑÑ. Кто-то обращаетÑÑ Ñледовать Ñоветом к дерматовенерологу, кто-то обходитÑÑ ÑобÑтвенным опытом. ÐеÑомненно, Ñамолечение в данном Ñлучае может приходить Ñвои плоды, Ñовет одна: — Ñоблюдать гигиену и целить точный противогрибковым ÑредÑтвом. Помимо противогрибкового дейÑÑ‚Ð²Ð¸Ñ Ð»ÐµÐºÐ°Ñ€Ñтво Тинедол от грибка увлажнÑет и оÑвежает кожу Ñтоп. ЕÑли изза ней не ухаживать кÑтати, то вÑкоре вам будет Ñлишком вÑтупать на приманка раÑтреÑкавшиеÑÑ Ñ‡ÐµÑ€ÐµÐ· ÑухоÑти пÑточки. И еÑли долго приходитÑÑ ÑˆÐ»ÑÑ‚ÑŒÑÑ Ð¸Ð»Ð¸ оÑтанавливатьÑÑ, то кожа Ñтоп проÑто «горит», Ñ‚Ñ€ÐµÐ±ÑƒÑ Ð¾Ñ…Ð»Ð°Ð¶Ð´ÐµÐ½Ð¸Ñ Ð¸ ÑвежеÑти, Tinedol Ñто чувÑтво дарит. УпотреблÑÑ‚ÑŒ ÑредÑтво необходимо как поÑле гигиеничеÑких процедур. Ðто значит, Ñколько мыть ноги накануне применением Тинедола обÑзательно. Тщательно выÑушить полотенцем, а уж поÑле наноÑить ÑобÑтвенно ÑредÑтво. И втирать, маÑÑировать, перед полного впитываниÑ. Вот тутто дейÑтвие крема Tinedol довольно Ñамым Ñффективным и принеÑет макÑимальный результат.
Great
I know this old and most people will likely not see this comment way down at a the bottom, but I thought I’d ring in anyway.
To find the apex if none is marked:
Measure yourself from apex to apex (the fullest part of your bust, it may not be the nipple as some say, mine is 1/4″ from the apex). Divide by 2.
Measure yourself from mid-shoulder to apex.
Measure the same areas on your pattern. Don’t forget that the apex to apex is ÷ by 2 since you’re working on half the pattern.
This will give the exact location.
For older and sagging bodies this is important, otherwise the fullest part of the top may not match the fullest part of you…how do you think I know =P .
I hope someone finds this helpful.
Brooke, thank you for this! Yes, very helpful. I found this post via Google and am trying to make this adjustment on the shirts I am making. Your way of finding the apex is simple and makes a lot of sense.