

In this article I’ll show you – step by step -how to do a Full bust alteration (an FBA) on your Rachel Wrap Dress pattern.
Why would you need a Full Bust Alteration, you ask?
Well. That’s because sewing patterns in general (In general. There are exceptions!) are drafted for a bust that is about the size of a standard B cup – which means that there is a difference of 4.5 cm (just under 2 “) between the high bust measurement and the full bust measurement. Now sometimes with grading, especially when grading the larger sizes, the pattern will go up to something more resembling a C-cup.
But. This often means, that if the difference between your high bust and your full bust is more than 4.5 cm (2″), you will probably need to choose your pattern size based on your high bust measurement (which corresponds to the full bust measurement you would have, if you had a B-cup bust) and then alter the pattern, by adding room for your bust only, but keeping, more or less, the same width across the shoulders and other places in the pattern.
There are several different ways to do a Full Bust Alteration (also called an FBA). I’ve already showed you a simple way to do the FBA in this blog post, and in this post I’ll show you a way, that’s a tiny bit more complicated, but works even better. If you’ve never tried doing a Full Bust Alteration before, you could start with the simpler method, and sew up the pattern in a cheaper fabric and maybe making the wrap dress as a top to test if the fit then works for you. To make a top, cut the pattern at about 10 cm (4″) above the hip line. No matter which FBA method you choose, come back, after you’ve done the initial alteration, to finish up the Full Bust Alteration for a wrap dress.
How I do the Full Bust Alteration (FBA) on the Rachel Wrap Dress:
The next part is a method you can use for all jersey tops or dresses. As long as it doesn’t have side seam bust darts, this will work:
You need to take your measurements before starting the alteration. If you don’t you won’t know how much to alter. You need your high bust measurement and your full bust measurement.
First things first: Split the pattern at the waistline, and put the skirt part away. After you’ve done the alteration, you’ll put the top and the skirt pattern together at the waistline again. Then draw the centre front line in on your pattern. It goes directly down from the centre front marking to the waistline, parallel to the grainline.
Then mark the bust point on your front pattern piece. Mark it at the spot where a line 9 cm (3½”) from centre front meets a line from 4 cm (1½”) down the side seam.

Make a line 1 from the waist seam (or a hem, if this was a pattern for a top), parallel to the grainline and to the bust point. Then turn that line into a point about 1/3 up the armcye seam.
Make a second line from a point about 4 cm (1½”) down the side seam line and to the bust point.
Also make a third line from line 1 and to the opposite side seam.
Cut line 1 from the hem through the bust point and continue cutting until the armcye seam line. Cut from the armcye seam allowance to, but not through, the seam line. This’ll allow you to spread the pattern when you’ve cut the lines.
Cut line 2 from the side seam seam allowance to, but not through to line 1 (you want to leave a hinge of about 2 mm paper). See more about these lines at THIS blog post about a traditional FBA.
Now. remember those measurements you took? You need to figure out how much to alter. Today I measure 87 cm at my high bust (which corresponds to what I’d measure in my full bust, if I had a B-cup bust). This makes me a size 38 according to the size chart for the Rachel Wrap Dress.
My full bust measures 94 cm. Size 38 has a bust measurement of 88 cm. So I need to add the width, I’m lacking. 94 cm minus 88 cm is 6 cm, so I need to add 6 cm with my full bust alteration. Since I’m doing the alteration on one side of the pattern (half of the pattern), I need to add 3 cm in my alteration.
So I spread the pattern at line 1 (keeping the cut edges parallel) that amount – i.e. 3 cm. (you should spread the amount, you need to add).
When I spread the pattern, line 2 will open up to create a dart. I insert paper under the spread and the dart and tape in place.
Now is the time to cut line 3 and move the bottom piece down so that the waistline lines up.

So far, so good. This is the way I often do my FBA no matter the pattern type…
I do not want a dart in my jersey wrap dress, so I’ll want to remove it. I do that, using the method, I talk about in THIS BLOG POST.
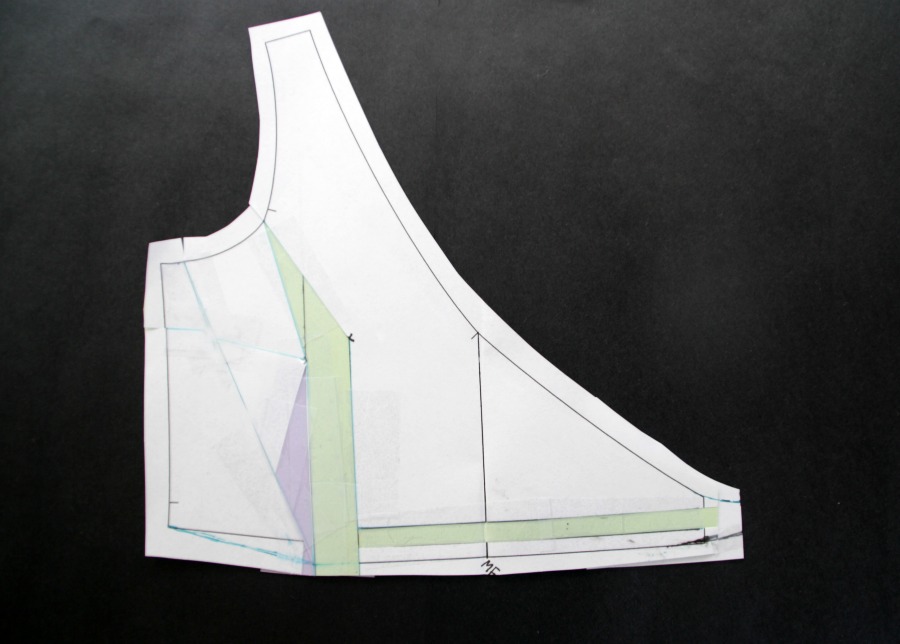
Here is how the pattern piece looks with the dart removed:
The special method for the wrap dress FBA:
So. Now we’ve added width to the bust of one half of the wrap dress pattern. And we’ve taken away the dart created by the FBA.
Now we need to add to the other half as well. This is how I do it:
Fold the pattern at the centre front line. Tape paper to the pattern and look through the paper to copy the lines from the other half. In essence you are mirroring the relevant part of the pattern to the other half.

Fold out the piece and mark the pattern at the right side of the pattern. You want to be sure you have marked the waist (or hem, if this was a top) and the side seam as far as it goes up on the original side.

And here comes the special part of the wrap dress FBA:
To make the wrap dress fit properly in a jersey fabric I’ve shortened the side with the tie by 3 cm (1 1/4″) when I drafted the pattern. This helps the dress hug the body more closely at the bust. So now you’ve got the mirrored part, which isn’t shortened at all – and you want o make sure it has the right width as well.
Measure 3 cm (1 1/4″) in from the side seam, draw a vertical line and cut.

When you’ve added seam allowances, this will be your new front piece pattern.
Now all you have to do is to add the same mount you added to the pattern (in my case 3 cm) to the end of the ribbing pattern piece. And that’s it. You are ready to cut and sew your lovely wrap dress!


Thank you so much for this! I will be using this FOR SURE! I’ll be honest, I didn’t really need another wrap dress pattern (LOL) but I bought this one anyway because I love the way it looks on you, and I love that the skirt is more of a slim silhouette than most wrap dresses :)
Quick question, if I want to make a sleeveless version, should I just adjust the armscye to narrow the shoulder a bit?
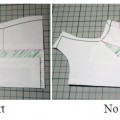
Thank you for such detailed FBA instructions! That’s why I decided to buy your pattern. I can’t figure out though how to put the top and skirt pattern back together at the waistline. The skirt is a straight edge and the top has a curved edge and they’re not the same width anymore. Thanks!
I second Kristina’s comment above. These instructions are fantastic, however I am now looking at a curved (and wider) top waist line and a straight waist on the skirt. How do we attach those back together? Thanks so much!
Hi, Maria. I recently purchased and constructed your Rachel Wrap Dress. I needed to do a FBA so I followed this tutorial. There is an error in this technique, and I feel you should correct it for your readers and customers. With this FBA method, the darts are transferred to the waistline seam. This dress doesn’t have a waistline seam, so it is impossible to complete the FBA as you have alluded in this tutorial (although you do not complete your instructions of rejoining the bodice and skirt pieces). To use the method you outline here, one must create a waistline seam to manage the dart intake that has been transferred there. Or you must do a traditional FBA with a side seam dart and narrow the side seam at the waist by the same amount that the waistline is increased by the FBA. If I am incorrect, I would be happy to learn my error but I could not figure any other way for your steps above to work. Thanks :-)
P.S. I also found the shoulders on this pattern to be drafted extremely narrow — I needed to add 1.5″ in width…
Hi Katrina
Well. I used the above method, and it worked fine. I will add a picture that shows how to connect the upper part to the lower part without adding a waist seam. Basicly, I’m just connecting them at the side seams and ignoring the extra space.
As for the shoulders. Well. I deliberately draft the shoulders in my jersey patterns to be a lot narrower than in traditional jersey drafting. This is because I think it gives a more elegant and less t-shirt-y look (I don’t think that’s a word, but you know what I mean). This is the same for all my jersey patterns. Of course, if you have wider shoulders than the standard measurement, you will probably need an adjustment, but if you do not, you might want to note if the armcye is placed at the right spot. I have drafted it to be at teh same place as I would for at close fitting woven blouse.
~ Maria
Just trying to follow the instructions to draw the lines 1, 2, and 3. Is there a picture of those 3 lines before you make the cuts. Not an experienced sewist here so maybe too advanced for me to follow but would be great to see the lines marked 1, 2 and 3 on the pattern because being inexperience, the sewing terminology is bit hard to follow.